How To Put On False Lashes: Your Easy Guide To Eye-Opening Beauty
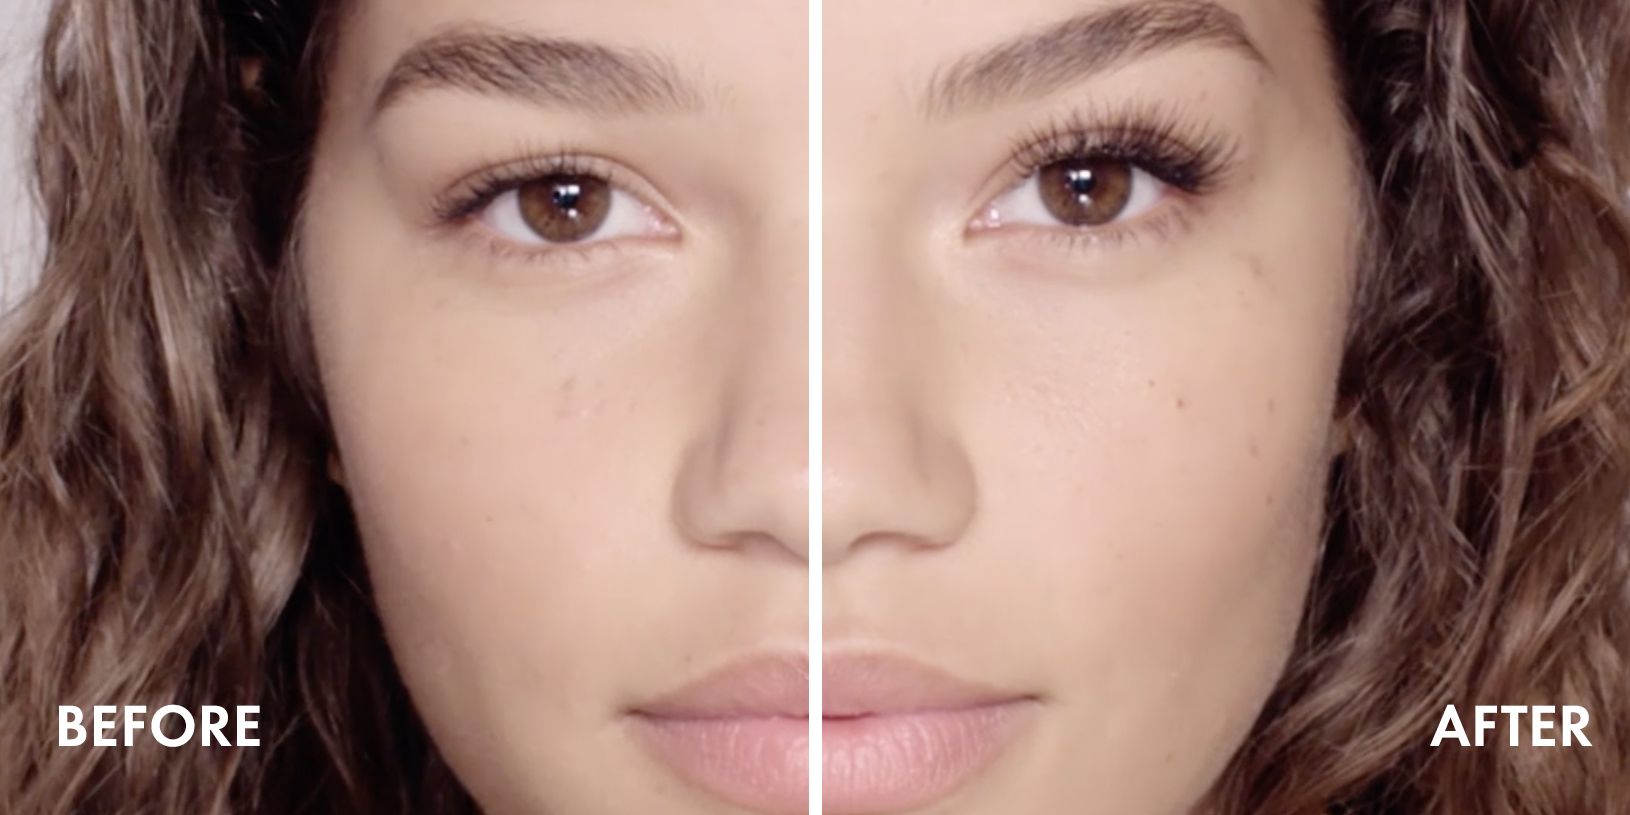
Adding false lashes can truly change your whole look, giving your eyes a bit more pop and a lovely, full appearance. Many people, you know, want that extra bit of glamour for a special event or just for everyday wear. It can seem a bit tricky at first, figuring out just how to get them to sit right, but honestly, it’s a skill anyone can pick up with a little patience.
For those who are just starting out, the idea of applying something so delicate near your eyes might feel, well, a little intimidating. You might wonder if they’ll actually stay put, or if you’ll end up with a sticky mess. But, as a matter of fact, with the right tools and a clear method, you can achieve a really polished outcome, pretty much every time.
This guide will walk you through the process, step by step, showing you how to place those beautiful lash strips so they look natural and feel comfortable. We’ll cover everything from getting your natural lashes ready to, you know, actually securing the falsies, making sure they blend in seamlessly. So, let's get those eyes ready to sparkle!
- Mansa Musa Net Worth
- Breast Milk In Bath Water
- Did Happy Gilmore 2 Make Money
- Rebecca Jones
- Goat Hill Park Golf Course Reviews
Table of Contents
- Getting Ready: Your Lash Prep Area
- Picking the Right Lashes and Glue
- The Actual Application: Step-by-Step
- Tips for a Flawless Finish
- Removing Your Lashes Gently
- Frequently Asked Questions
- Making Your Lashes Last
Getting Ready: Your Lash Prep Area
Before you even pick up a lash, it's really helpful to get your workspace organized. You know, just like setting up a system for any task, having everything at hand makes the process smoother. You'll want a clean, well-lit spot, perhaps with a mirror that lets you see your eyes up close. This preparation, in a way, is about making sure you have all the necessary "system variables" in place, so to speak, for a successful application.
Gather your tools: you’ll need your chosen false lashes, lash adhesive, a pair of small scissors, tweezers or a lash applicator tool, and maybe some mascara and eyeliner. Having these items ready means you won't have to stop mid-application to hunt for something, which can be, well, a bit frustrating. It’s about creating an environment where you can focus on the delicate task at hand.
Some people, you know, find it helpful to curl their natural lashes and apply a light coat of mascara before putting on the falsies. This step helps create a nice base for the false lashes to sit on and, actually, helps them blend better. It's like preparing an existing resource for an update; you're making your natural lashes ready to be enhanced.
- Maria Ozawa Debut
- Davis Last Name Origin
- Frontman Of Kiss
- Tyler Love Island Usa
- Panes Con Pollo Salvadoreños
Picking the Right Lashes and Glue
Choosing the right lashes and adhesive is, honestly, a really important part of the whole process. The type of lash can change your entire look, and the glue, well, that's what keeps everything securely in place. You want something that feels comfortable and, you know, looks good too.
Choosing Your Lash Style
False lashes come in many different styles, from very natural to dramatic and full. For beginners, it's often a good idea to start with a more natural-looking strip lash. These are usually lighter and, actually, easier to handle. They just add a little bit of extra length and volume without being too overwhelming.
You might see lashes labeled "wispy," "natural," or "glam." "Wispy" lashes have varying lengths that mimic natural growth, making them a bit more subtle. "Natural" styles are usually shorter and lighter, perfect for everyday wear. "Glam" lashes are, you know, much fuller and longer, designed for a really striking appearance. So, think about the occasion and the kind of effect you're hoping to create.
There are also individual lashes or clusters, which can give a very customized look, but these are, perhaps, a bit more advanced to apply. For now, focusing on strip lashes is probably the way to go. They're designed to be, you know, a single piece that you place along your lash line.
Selecting the Best Adhesive
The lash glue, or adhesive, is truly key to making your lashes stay put. There are different types, but the most common ones dry clear or black. Clear glue is, you know, often a good choice for beginners because any little mistakes in application won't be as noticeable. Black glue can blend in with eyeliner, but it requires a bit more precision.
Some glues are latex-based, and some are latex-free for those with sensitivities. It's a good idea to, you know, check the ingredients if you have allergies. You want a glue that offers a strong hold but is also gentle enough for your delicate eye area. A good quality glue will ensure your lashes remain in their specified position throughout the day or night.
When you're putting on false lashes, the adhesive acts like the content you're putting onto the server, so to speak. If there's no content, or in this case, not enough glue, well, you're not really putting anything on, and the lash won't stick. It’s like when a request has no enclosed entity; there’s nothing to actually "put" onto the server, unless you wanted to, you know, put nothing at all, which for lashes, means they won't stay!
The Actual Application: Step-by-Step
This is where the magic happens, where you actually "put" the lashes on. It’s a process that, you know, requires a steady hand and a bit of patience, but it gets easier with practice. Think of it as carefully placing a new element to update your overall look, much like how an existing resource is updated.
Step 1: Measure and Trim
Take a lash strip out of its tray and, you know, gently hold it up to your eye. Align the strip with your natural lash line to measure if it’s the right length for your eye shape. Most lashes are made to be a bit longer than needed, so you'll probably need to trim them. This step is pretty much essential for comfort and a natural look.
Using your small scissors, trim the excess from the outer corner of the lash strip. Never trim from the inner corner, as that part is designed to be shorter and more natural-looking to fit closer to your tear duct. Trimming ensures that the lash doesn't poke your eye or, you know, extend too far past your natural lash line, which can look a bit unnatural.
Some people, you know, find it helpful to trim a tiny bit at a time, re-measuring as they go, just to make sure they don't cut too much. It’s a bit like adjusting a variable; you want to make sure it's just right for your specific needs. This small adjustment makes a big difference in how the lashes will sit and feel.
Step 2: Apply the Adhesive
Now, apply a thin line of lash adhesive along the band of the false lash. You don't need a lot, just a consistent, thin layer. Make sure to put a little extra glue on the very ends of the lash band, as these are the spots that, you know, tend to lift first.
After applying the glue, wait about 30-60 seconds for it to get tacky. This is a really important step! If you try to apply the lash when the glue is still too wet, it will slide around and, actually, make a mess. If it’s too dry, it won’t stick at all. The glue should feel sticky to the touch, but not wet.
This waiting period is, you know, a bit like letting the server decide how to create a new resource. You're giving the adhesive time to reach its optimal state for bonding. It’s a moment of pause, allowing the glue to become ready to, you know, truly perform its job of holding the lash in its specified position.
Step 3: The Placement Moment
Using tweezers or a lash applicator tool, carefully pick up the false lash. Look down into a mirror, or close your eye slightly, and place the lash band as close as possible to your natural lash line, starting from the center of your eye. This is where you really put the lash into its desired position.
Once the center is in place, gently press down the outer corner, then the inner corner. The goal is to get the false lash band to sit right on top of your natural lashes, not on your eyelid skin. This is, you know, pretty much the most critical part for a natural appearance and comfortable wear.
Some people find it easier to use their fingers once the lash is initially placed to gently press the band down along the lash line. This action, you know, helps to secure it fully. It’s about ensuring that the lash is, actually, firmly attached and not just loosely sitting there.
Step 4: Secure and Blend
Once the lash is in place, gently press down on the false lash band with your fingers or the applicator tool, along the entire length of your lash line. This helps to really secure it and make sure it's bonded properly. You want to make sure there are no gaps or lifted areas. This is, you know, essentially updating your lash line resource with the new, fuller look.
If there are any noticeable gaps between your natural lashes and the false ones, you can, you know, use a bit of liquid eyeliner to fill them in. This helps to create a seamless transition and makes the false lashes look like they're truly part of your own. A little bit of mascara can also help blend your natural lashes with the falsies, but apply it gently and only after the glue is completely dry.
You can also, you know, gently pinch your natural lashes and the false lashes together with your fingers or a lash curler (be very careful with a curler once the lashes are on, as it can pull them off if not done gently). This final step helps to marry the two together, creating a unified, full look. It's about making sure everything is in its correct relationship, just as the meaning of "put" implies.
Tips for a Flawless Finish
To really make your false lashes look amazing, there are a few extra things you can do. These little tricks can, you know, make a big difference in how natural and long-lasting your lashes appear. It’s about, honestly, paying attention to the details.
- **Practice makes perfect:** Don't get discouraged if your first attempt isn't, you know, absolutely perfect. It takes a little bit of practice to get the hang of it. You'll get better with each try, really.
- **Pre-shape your lashes:** Before applying glue, gently bend the lash strip into a "C" shape a few times. This helps it conform to the curve of your eye better and, actually, makes application a bit easier.
- **Use a mirror that magnifies:** A magnifying mirror can help you see exactly where you're placing the lash, which is, you know, really helpful for precision.
- **Don't forget the inner corner:** Make sure the inner corner of the lash is securely attached, but not poking your eye. This area, you know, tends to lift easily if not enough glue is applied or if it's not pressed down properly.
- **Consider lash segments:** If full strips are too tricky, you know, try cutting a strip into two or three smaller segments. Applying these shorter pieces can be much easier to control and place.
These small adjustments can, you know, really improve your experience. It's about finding what works best for you and your eye shape. Remember, the goal is to make them look like they're, actually, your own beautiful lashes.
Removing Your Lashes Gently
When it’s time to take your lashes off, you know, don't just pull them! This can damage your natural lashes and the false ones too. Gentle removal is key to preserving both. It’s like, you know, making sure you properly handle any resource you've updated.
Apply an oil-based makeup remover or micellar water to a cotton pad. Gently press the pad onto your closed eyelid for about 30 seconds. This helps to, you know, loosen the adhesive. The moisture and oil will start to break down the glue, making removal much easier.
After the glue has softened, gently peel the false lash from the outer corner towards the inner corner. It should come off quite easily. If you feel any resistance, apply more remover and wait a little longer. You want to, you know, avoid any pulling or tugging.
Once removed, gently clean any leftover glue from the lash band with a cotton swab dipped in makeup remover. Store your lashes back in their original tray to help them keep their shape and, actually, extend their lifespan. This gentle care allows you to reuse them multiple times, getting more value from your purchase.
Frequently Asked Questions
Is it hard to put on false eyelashes?
Honestly, it can feel a little challenging at first, but it's really a skill that, you know, gets much easier with practice. Most people find that after a few tries, they get the hang of it. It's about getting the placement just right and, actually, letting the glue get tacky enough before you put them on.
What do you put false lashes on with?
You typically use a specialized lash adhesive, often called lash glue. You apply this glue to the band of the false lash. Then, you know, you use tweezers or a lash applicator tool to place the lash onto your natural lash line. Some people also use their fingers for the final placement and pressing down.
How do you make false lashes stay on all day?
To make them stay, you know, really well, make sure you apply a thin, even layer of glue and let it get tacky for about 30-60 seconds before putting the lash on. Press the lash band firmly onto your natural lash line, especially at the inner and outer corners. A good quality, long-hold adhesive also, you know, makes a big difference. Avoiding oil-based products near your lashes throughout the day can also help them stay put.
Making Your Lashes Last
Taking good care of your false lashes means you can, you know, reuse them many times, which is great for your wallet and, actually, pretty good for the environment too. Proper cleaning and storage are key to their longevity. It’s like maintaining any valuable resource; you want to keep it in good condition.
After you gently remove your lashes, clean off any excess glue from the band. You can do this by, you know, gently peeling it off with your fingers or using a cotton swab with a little bit of oil-free makeup remover. Be careful not to pull on the lash hairs themselves.
Once clean, place the lashes back into their original tray or a dedicated lash case. This helps them keep their natural curve and, you know, protects them from getting squashed or losing their shape. Storing them properly means they’ll be ready for your next application, looking just as good as new. Learn more about makeup techniques on our site, and you can also check out this page for other beauty ideas.
Getting those false lashes just right, you know, it truly can make a difference in your whole look. It's about, you know, a little bit of practice, and then, actually, you'll be placing them perfectly every time. So, are you ready to give it a try? For more insights on beauty and self-care, you might find useful information on reputable beauty blogs, such as those found on sites like Allure or Byrdie, which often provide expert advice on makeup application and product reviews.
- Tina The Xplorer Onlyfans
- Mayme Johnson Godfather Of Harlem
- Amy Winehouse Nationality
- Dakota Johnson Boyfriend
- Tinaexplorez Leaked
Makeup Tutorial No False Lashes - Bios Pics

Can You Put False Lashes On Lash Extensions? - Luxe Luminous
First time trying false lashes. OMG are they hard to put on lol | Scrolller
