Discover Smooth, Shiny Hair: Your Guide To Keratin Treatment At Home
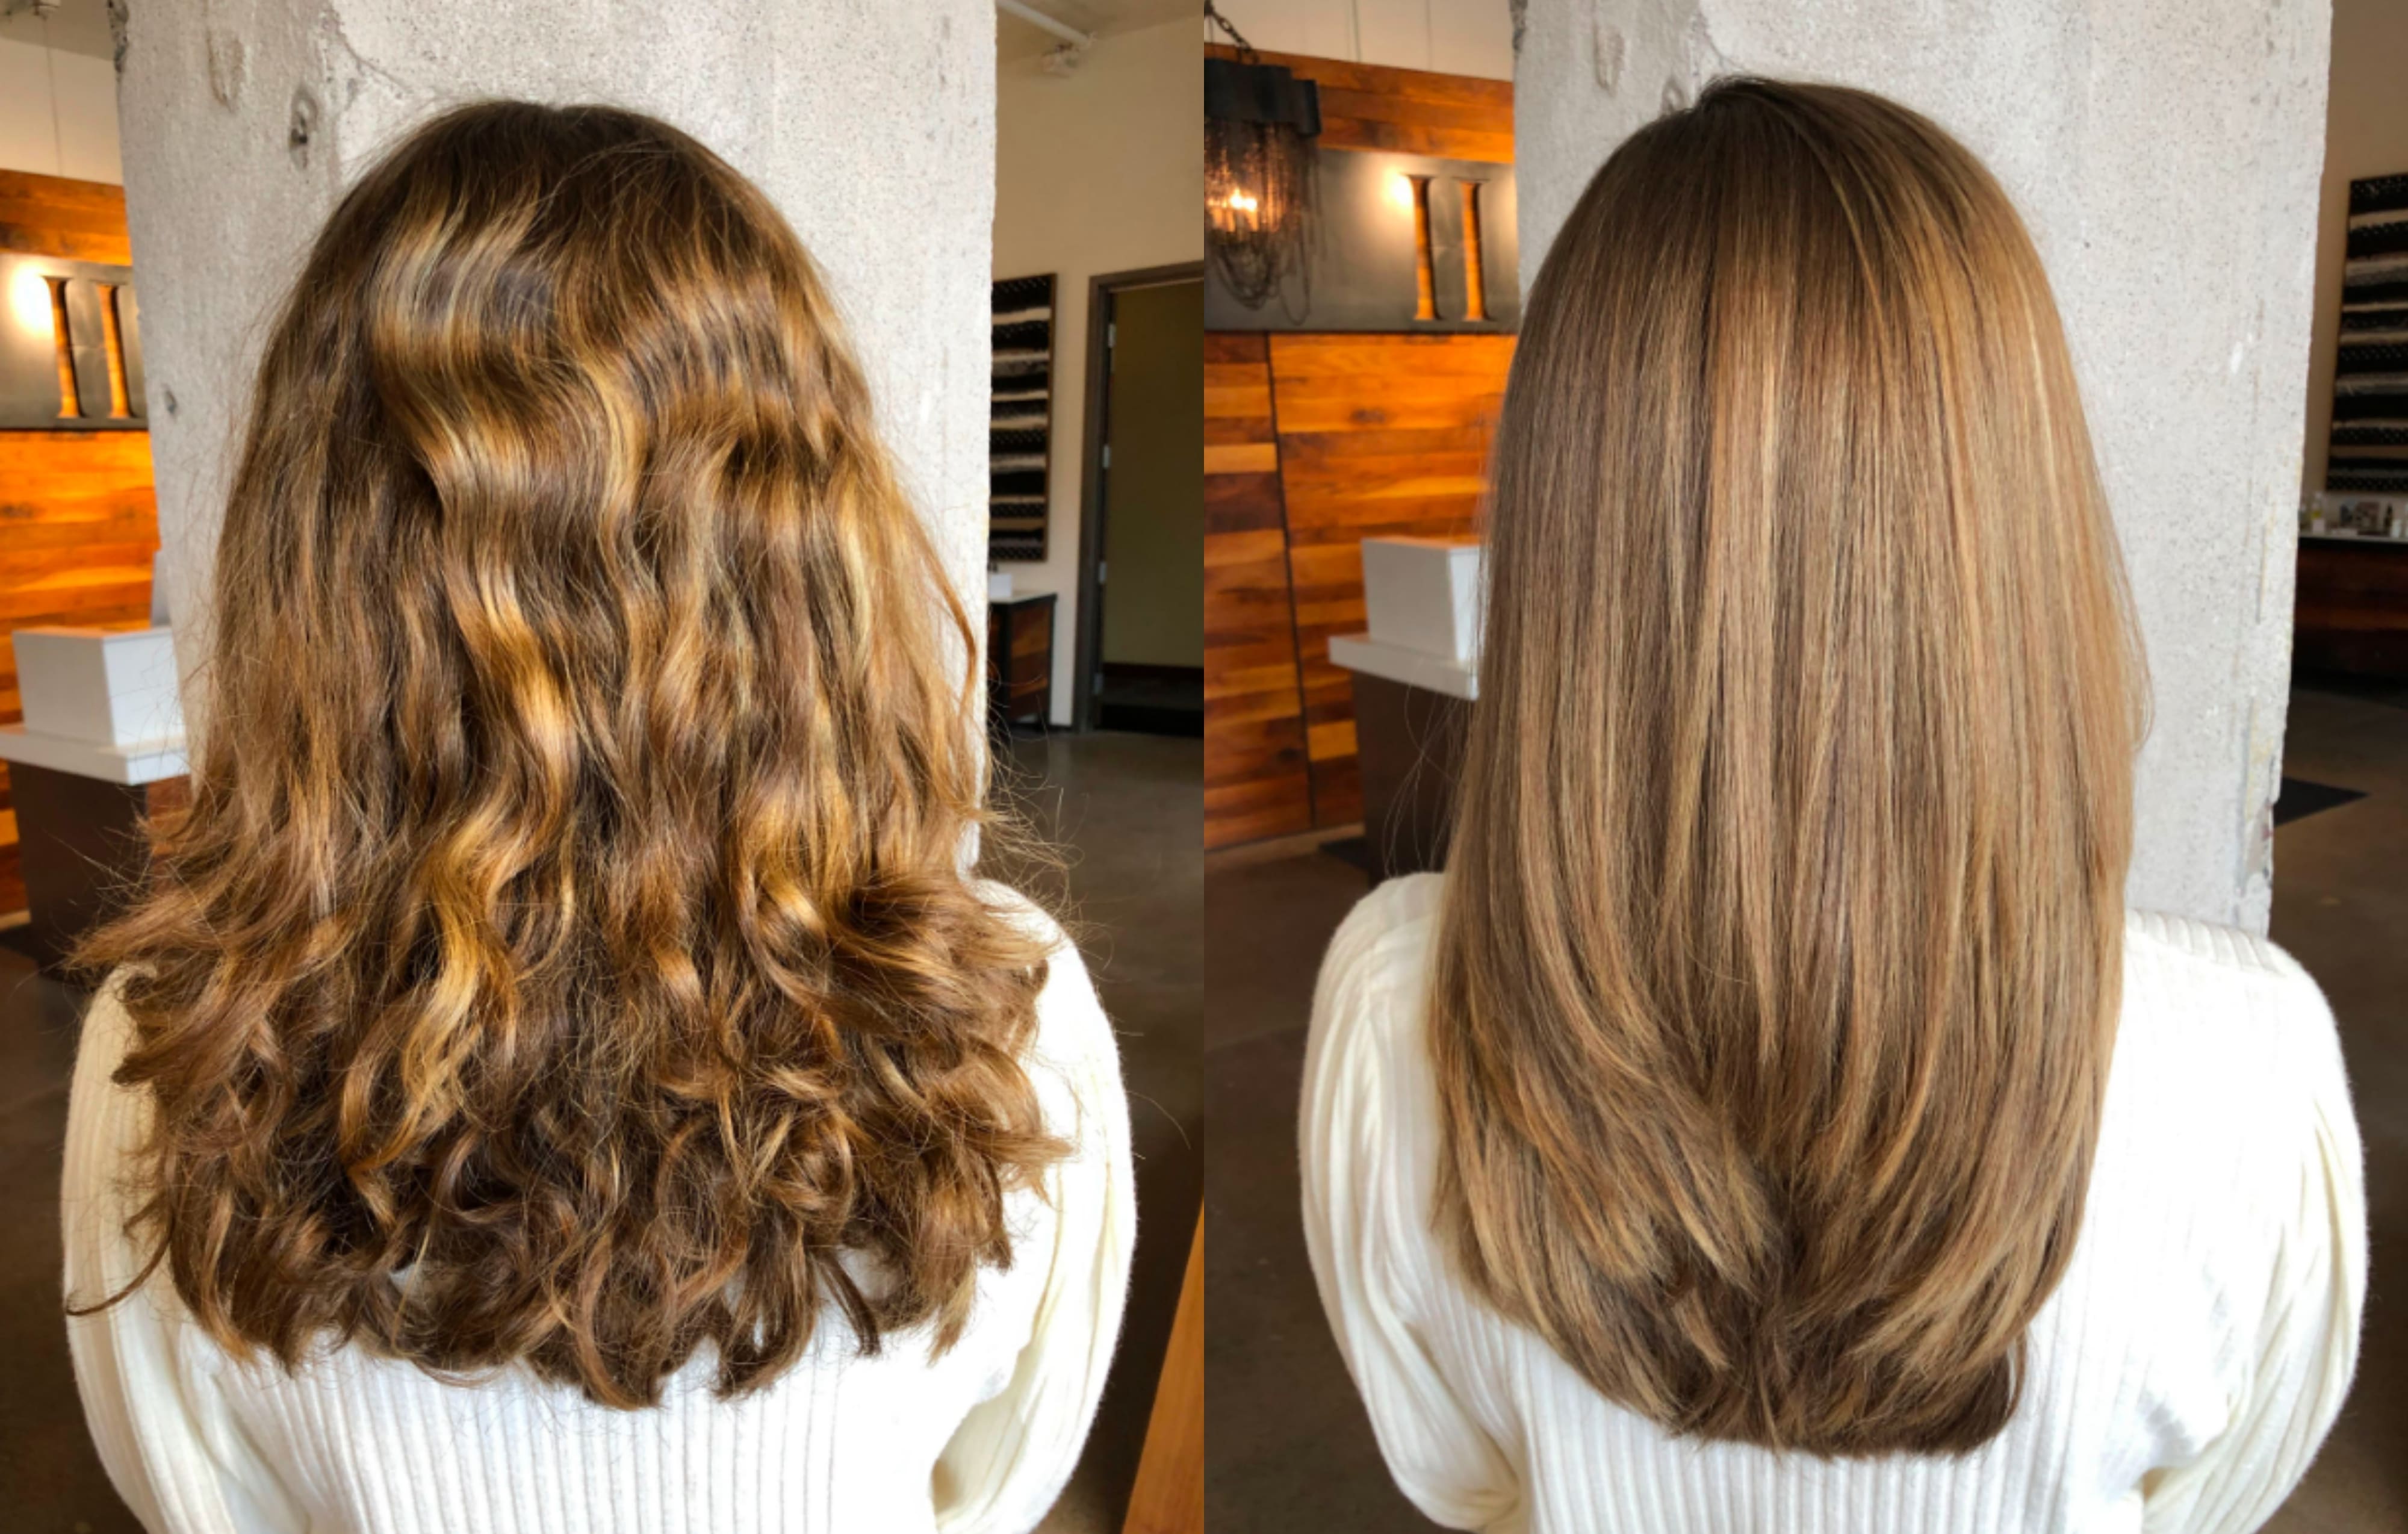
Dreaming of sleek, manageable hair without the salon price tag? You're not alone, and it's almost certainly possible to get that look right in your own space. Keratin treatment at home has become a real favorite for so many people wanting to calm frizz and boost shine. It’s a pretty smart way to get salon-like results, you know, but on your own schedule and for much less money.
For years, getting super smooth hair meant a trip to a fancy salon, often costing a lot and taking up a big chunk of your day. But, actually, things have changed quite a bit. Now, with so many great products available, you can bring that hair transformation into your bathroom, which is pretty convenient.
Whether you're dealing with stubborn frizz or just want your hair to feel incredibly soft and look amazing, these at-home options are, like, a perfect solution. We've gathered some insights from hair experts and stylists, so you can really understand how to pick the best treatments and what to expect, basically.
- Persbrandt
- Is Sara Driver Related To Adam Driver
- Will Ferrell Kids
- Is Zangi Messenger Safe From Hackers
- Esme Tiktok Age
Table of Contents
- Why Try Keratin Treatment at Home?
- What is Keratin and How Does It Work?
- Choosing Your At-Home Keratin Kit
- Preparing Your Hair for the Treatment
- Step-by-Step Guide to At-Home Keratin
- Maintaining Your Keratin-Treated Hair
- Natural Keratin Treatment at Home Options
- Frequently Asked Questions About At-Home Keratin
Why Try Keratin Treatment at Home?
Getting a professional keratin treatment at a salon can be quite expensive, and it takes a long time, too. For many, that's just not practical, you know? At-home options provide a really good alternative, offering similar benefits without the high cost or the need for a lengthy appointment.
You can get soft, smooth, and sleek hair from your own bathroom, which is pretty amazing. It’s all about convenience, actually, and saving money while still getting great results. Kits, serums, and masks are designed to make this process simple for you.
So, if you want your hair to be straighter and smoother, and you prefer doing things yourself, these treatments are a perfect fit. They really do help transform frizzy, unruly hair into something much more manageable and shiny, too.
What is Keratin and How Does It Work?
Keratin is a protein that your hair, skin, and nails naturally have. It's like a building block for healthy hair, basically. When your hair gets damaged, say from heat styling or coloring, it loses some of this important protein, which can make it look frizzy or dull, so.
Keratin treatments work by adding this protein back into your hair. It fills in the gaps in your hair's cuticle, which is the outer layer. This process makes your hair feel stronger and look much smoother, which is pretty cool.
It helps to smooth the hair texture, making it less prone to frizz and more reflective of light, so it looks super shiny. This is why keratin treatments have gained immense popularity over the past few years, you know, for their ability to really transform hair.
The Science Behind the Smooth
When you apply a keratin treatment, the protein bonds with your hair's natural keratin. Heat, usually from a flat iron, helps to seal this protein into the hair shaft, which is important. This creates a protective layer around each strand, making the hair feel incredibly smooth and look much sleeker, actually.
This process also helps to reduce drying time, which is a nice bonus. Because the hair cuticle is sealed, it holds less water, so it dries faster. It’s pretty much a win-win for anyone looking for easier styling and better-looking hair.
The treatment essentially creates a temporary barrier that keeps humidity out and moisture in, which is vital for fighting frizz. This is why your hair stays smooth and shining for a long period, even in damp conditions, you know, which is great.
Choosing Your At-Home Keratin Kit
When you're looking for the best at-home keratin treatments, you'll find a few different types of products. There are full kits, which typically include everything you need, and then there are serums and masks that offer a lighter touch, so.
The best picks, according to hair experts and stylists, are those that offer a good balance of effectiveness and safety. You want something that will deliver results without being too harsh on your hair, you know, which is pretty important.
Consider your hair type and what you want to achieve. Some products are better for really curly hair, while others are great for just a bit of smoothing. It's about finding the right fit for you, basically.
Kits, Serums, and Masks, Oh My!
Full kits usually contain a clarifying shampoo, the keratin treatment solution, and sometimes a conditioner or mask to use afterwards. These are designed for a more comprehensive treatment, offering a deeper smoothing effect, actually.
Serums and masks, on the other hand, are often used as maintenance or for a less intense smoothing experience. They can help extend the life of a full treatment or just give your hair a quick boost of shine and softness, which is pretty handy. They're good for regular use, too.
So, if you're looking for a big change, a kit might be your best bet. If you just want to manage light frizz or add some gloss, a serum or mask could be all you need, you know. It really just depends on your hair goals.
What to Look For in a Product
When picking an at-home keratin treatment, check the ingredients list. Some products contain formaldehyde or formaldehyde-releasing chemicals, which can be irritating, so. Many brands now offer formaldehyde-free options, which are generally preferred for home use.
Look for products that also include nourishing ingredients like argan oil, coconut oil, or shea butter. These can help keep your hair hydrated and healthy during and after the treatment, which is pretty nice. They add extra care, you know.
Reading reviews from other users can also be super helpful. People often share their real experiences, including how easy the product was to use and the actual results they got, which is very useful. This gives you a good idea of what to expect, basically.
Preparing Your Hair for the Treatment
Before you start any at-home keratin treatment, it's really important to prepare your hair properly. This step helps the treatment work its best, you know, and ensures you get the smoothest results possible. It’s like getting ready for a big project.
First, you'll want to wash your hair thoroughly with a clarifying shampoo. This kind of shampoo helps remove any product buildup, oils, or impurities that might be on your hair, so. It creates a clean canvas for the keratin to really penetrate.
Make sure your hair is completely clean and free of any residue. This step is pretty crucial for the treatment to properly adhere to your hair strands. After washing, gently towel dry your hair until it's damp, not soaking wet, basically.
Step-by-Step Guide to At-Home Keratin
Applying an at-home keratin treatment isn't too complicated, but following the instructions carefully is key. Each kit might have slightly different steps, so always read your specific product's guide first, you know. This is just a general overview.
Cleanse Your Hair: As mentioned, use a clarifying shampoo. Rinse it out completely. Some kits might ask you to wash twice, so just check.
Dry Your Hair: Gently towel dry your hair until it's about 70-80% dry. It should feel damp but not dripping. Some treatments might suggest blow-drying completely, so pay attention to your product's instructions, too.
Section Your Hair: Divide your hair into several small, manageable sections. This makes it much easier to apply the product evenly. Clips are really helpful here, actually.
Apply the Treatment: Put on gloves to protect your hands. Apply the keratin solution section by section, starting about a half-inch from your scalp and working your way down to the ends. Make sure to coat each strand evenly but avoid saturating your hair too much, you know.
Process: Let the treatment sit on your hair for the time recommended in your kit's instructions. This waiting period is really important for the keratin to do its work. Don't leave it on longer than suggested, basically.
Rinse (or Don't): Some treatments require a light rinse after processing, while others tell you to just dry the product into your hair. Follow your kit's specific directions very carefully here, as this step varies a lot.
Blow-Dry: Blow-dry your hair completely straight using a round brush. This helps to activate the keratin and start the smoothing process. Make sure your hair is totally dry before moving on, actually.
Flat Iron: This is a crucial step for many treatments. Using a flat iron set to the recommended temperature (often around 400-450°F for professional-grade results, but check your product for specifics), go over small sections of your hair several times. This seals the keratin into the hair cuticle, making it super smooth and straight, you know.
Remember, patience and precision are your best friends during this process. Taking your time with each step will really pay off with better results, basically.
Maintaining Your Keratin-Treated Hair
Once you've completed your at-home keratin treatment, proper aftercare is pretty important to make the results last. You want to protect that smooth, shiny look for as long as you can, right? So, there are a few things to keep in mind, you know.
For the first 72 hours after treatment, try to avoid washing your hair, tying it up, or tucking it behind your ears. This allows the keratin to fully set and bond with your hair. It's a bit of a commitment, but it really helps, actually.
When you do wash your hair, use sulfate-free and sodium chloride-free shampoos and conditioners. These ingredients can strip the keratin from your hair, making the treatment wear off faster, so. Look for products specifically designed for keratin-treated hair, which is a good idea.
Try to limit how often you wash your hair, too. Washing every two or three days instead of daily can help extend the life of your treatment. Dry shampoo can be a real lifesaver on those in-between days, basically.
Also, protect your hair from chlorine and saltwater. These can also break down the keratin. If you're going swimming, wet your hair with clean water first and apply a leave-in conditioner to create a barrier, which is pretty smart.
Using a silk pillowcase can also help reduce friction and keep your hair smoother while you sleep. It's a little luxury that makes a big difference, you know, for maintaining that sleek look.
Natural Keratin Treatment at Home Options
If you're looking for a gentler, more natural approach to smoothing your hair, there are ways to boost your hair's protein and shine using ingredients you might already have in your kitchen. These won't give you the same super-straight results as chemical treatments, but they can definitely help with frizz and add a healthy glow, so.
You can learn how to do keratin treatment at home naturally to keep your hair smooth and shining for a long period, using natural kitchen ingredients. These methods focus on nourishing your hair with proteins and healthy fats, actually.
For example, an egg mask can provide a good protein boost. Eggs are rich in protein, which is great for strengthening hair. Mix an egg with a bit of yogurt and olive oil for a deeply conditioning mask. Apply it to your hair, leave it on for about 30 minutes, and then rinse thoroughly, you know.
Another popular natural option involves a banana and avocado mask. Both are packed with vitamins, minerals, and healthy fats that can smooth and moisturize hair. Mash a ripe banana and half an avocado together, add a spoon of coconut milk, and apply this creamy mixture to your hair. Leave it on for an hour, then rinse well, basically.
These natural remedies are a wonderful way to give your hair some love and improve its texture over time. They're pretty gentle and can be used regularly to maintain hair health and shine, too.
Frequently Asked Questions About At-Home Keratin
People often have a lot of questions about doing keratin treatments at home. It's totally normal to wonder about the process and what to expect, you know. Here are some common queries, with insights from hair experts and stylists, too.
How often can you do keratin treatment at home?
The frequency really depends on the specific product you're using and how long the effects last for your hair. Generally, most at-home keratin treatments are designed to last anywhere from 4 to 8 weeks. So, you might repeat the treatment every 2 to 3 months, basically.
It's important not to overdo it, though. Giving your hair a break between treatments is a good idea, you know. Always check the product's instructions for their specific recommendations, as some might be milder and allow for more frequent use than others, actually.
If you're using natural methods, you can do those more often, perhaps once a week or every two weeks, since they are much gentler and focused on nourishment rather than chemical alteration, so.
Can it damage your hair?
When done correctly and with the right products, at-home keratin treatments are generally safe for your hair. However, like any chemical process, there's always a slight risk if not done properly, you know. Using too much heat with the flat iron or leaving the product on for too long can potentially cause damage, actually.
It's super important to follow the instructions precisely and choose reputable brands. Products containing high levels of formaldehyde can be more harsh and might cause dryness or breakage over time, so. Opting for formaldehyde-free options is often a safer choice, basically.
If your hair is already very damaged or bleached, it's a good idea to consult with a hair professional first. They can give you advice on whether a keratin treatment is suitable for your hair's current condition, which is pretty smart. Learn more about hair care on our site.
How to do keratin treatment at home naturally to keep your hair smooth and shining for a long period, using natural kitchen ingredients?
As we talked about earlier, using natural kitchen ingredients can certainly help improve your hair's smoothness and shine over time. While these won't straighten your hair like a salon treatment, they provide deep conditioning and protein boosts, you know, which is really beneficial.
Ingredients like eggs, yogurt, olive oil, bananas, and avocados are fantastic for homemade hair masks. These ingredients are rich in proteins, vitamins, and healthy fats that nourish the hair shaft, making it feel softer and look glossier, actually.
To make a natural mask, simply blend your chosen ingredients until smooth, apply to damp hair, leave for 30-60 minutes, and then rinse thoroughly. Consistent use, perhaps once a week, can really help maintain that smooth and shining look for a long period, basically. For more detailed natural recipes, you can find great resources on sites like Healthline, and link to this page for more natural hair remedies.

Sleek Strands at Home: Mastering the Keratin Treatment in Your Own Space

Keratin Treatment Toronto
We Tried It: Haus Salon’s Keratin Hair Treatment | Artful Living Magazine
