Mastering Dutch Braids: Your Complete Guide To Beautiful Braided Styles
Have you ever looked at those amazing, seemingly intricate braids and wondered, "How do they do that?" Well, chances are you're admiring the beauty of dutch braids, a truly popular and, honestly, quite stunning hairstyle that adds a touch of charm to just about any look. It's almost like magic how they stand out, giving your hair a lovely, three-dimensional effect that really catches the eye. This style, you know, has become a favorite for so many, from everyday wear to special occasions, and for very good reason.
These braids are, in a way, the reverse of a traditional French braid. Instead of tucking sections over, you cross them under, making the braid pop right off your head. This technique gives it that distinct, raised appearance, making it look fuller and more defined. It’s a versatile style, too, that can be dressed up or down, offering a lot of room for creativity.
So, if you've been wanting to try your hand at creating these gorgeous styles, or maybe you just want to understand what makes them so special, you've come to the right spot. We're going to explore everything about dutch braids, from their interesting origins to step-by-step instructions, and even some clever tips to keep your braids looking fresh. You'll soon see that achieving this look is more accessible than you might think, and perhaps you'll find your new go-to hairstyle!
- Yololary Spiderman Suit
- Jackson Felt Only Fans
- Addams Family Grandmama Costume
- Sodam Dublin Menu
- Are Harry Boschs Tattoos Real
Table of Contents
- Understanding Dutch Braids: What Makes Them Special?
- Getting Ready: Tools and Hair Prep for Perfect Braids
- Step-by-Step Guide: How to Braid Dutch Style
- Popular Dutch Braid Hairstyles to Try
- Tips for Keeping Your Dutch Braids Looking Great
- Beyond the Basics: Advanced Dutch Braid Ideas
- Frequently Asked Questions About Dutch Braids
Understanding Dutch Braids: What Makes Them Special?
When you see a dutch braid, it's pretty clear it's something special. It stands out, literally, from your head, giving a really cool, almost woven look. This distinct appearance is what makes it so appealing to so many people, and it’s a big part of why it's such a popular choice for all sorts of hair types and lengths. It truly does have a unique charm.
The Core Idea Behind Dutch Braids
The main idea behind a dutch braid, you know, is all about how you cross the strands. Unlike a regular braid where you cross pieces over the middle, with a dutch braid, you cross each section under the middle piece. This simple change makes the braid sit on top of your hair, giving it that raised, almost "popping out" effect. It’s this technique that creates the lovely, textured look that people find so attractive. Basically, it’s an inside-out braid.
Dutch vs. French Braids: Spotting the Difference
People often mix up dutch braids and French braids, and that’s understandable, as a matter of fact. They both start at the top of the head and add hair as you go down. The key difference, though, comes down to that crossing method. A French braid involves crossing hair sections over the middle strand, which makes the braid lie flat and blend into your hair. A dutch braid, on the other hand, involves crossing sections under the middle strand, which pushes the braid outward, making it look much more prominent and defined. So, if the braid looks like it's sitting on top of your hair, it's probably a dutch braid, you know?
A Little History: Why "Dutch"?
It's a really interesting question, why is it called a "dutch" braid? The name itself points to a connection with the Netherlands, or what was historically known as the Dutch Republic. You see, the word "Dutch" in English actually comes from "Deutsch," which is the German word for German. It's a bit of a historical twist, but it basically became the name used for the people of the Netherlands. During periods like the First Empire, there was even a "Kingdom of Holland" established, and the "Dutch Republic" was a significant entity, so it's not surprising that things associated with the region picked up that name. While "Holland" technically refers to just two provinces within the larger country, which is now officially called the Netherlands, the term "Dutch" stuck around for many cultural items, including, it seems, this particular style of braid. So, it's a nod to that historical and geographical link, even if the exact origin of the braid's name isn't precisely documented. It’s a bit like how some dishes get named after a place, you know?
Getting Ready: Tools and Hair Prep for Perfect Braids
Before you even think about starting to braid, a little preparation goes a long way. Having the right tools and getting your hair ready can make all the difference between a frustrating attempt and a beautifully finished dutch braid. It really does make the process so much smoother, honestly.
What You'll Need
- A good comb or brush: For detangling and smoothing your hair. A fine-tooth comb is great for precise partings.
- Hair elastics or ties: Small, clear ones are often best, especially if you want the ends to be discreet.
- Hair clips or sectioning clips: Very helpful for holding sections of hair out of the way.
- Water spray bottle: To slightly dampen hair, which can make it easier to manage.
- Hair products (optional): A light styling cream, a bit of mousse, or even a texturizing spray can help with grip and flyaways.
Having these items handy before you begin will, you know, save you from stopping halfway through your braiding process. It's like having all your ingredients ready before you start cooking.
Prepping Your Hair Just Right
Clean hair can be a bit too slippery for braiding, so hair that's a day or two old often works best. If your hair is freshly washed, you might want to add a little dry shampoo or a texturizing spray to give it some grip. This helps the braid hold together better and prevents strands from slipping out. Make sure your hair is completely detangled; any knots will make braiding much harder and can cause breakage. Gently brush through it, making sure it’s smooth from roots to ends. If your hair is very dry or prone to static, a light mist of water can help calm it down. Just a little, not too much, as you don't want it soaking wet, just slightly damp to make it more cooperative. This step is, you know, pretty important for a neat outcome.
Step-by-Step Guide: How to Braid Dutch Style
Now for the fun part: actually creating your dutch braid! It might seem tricky at first, but with a little practice, you'll get the hang of it. Just remember, it’s all about those under-crossings. You'll be surprised how quickly you pick it up, honestly.
Starting Your Braid
- Part your hair: Decide where you want your braid to start. For a single braid, you might start at the top center of your head. For two braids, create a neat center part from your forehead all the way down to your nape. Use a comb for a clean line.
- Take your first section: At the very top of your head, where you want the braid to begin, grab a small, triangular section of hair. This will be your starting point. Make sure it's smooth and free of tangles.
- Divide into three strands: Split this initial section into three equal strands. Let's call them left, middle, and right.
This initial division is, you know, pretty crucial for setting up the whole braid. Take your time with it.
Adding Sections Smoothly
- Cross the right strand under the middle: Take the rightmost strand and cross it under the middle strand. The right strand is now the new middle.
- Cross the left strand under the new middle: Take the leftmost strand and cross it under the new middle strand. The left strand is now the new middle.
- Add hair from the side (right): Now, before you cross the next right strand, pick up a small, new section of loose hair from the right side of your head, right next to your current braid. Add this new hair to your existing right strand.
- Cross the combined right strand under the middle: Take this newly combined, thicker right strand and cross it under the middle strand.
- Add hair from the side (left): Do the same on the left side. Pick up a small, new section of loose hair from the left side of your head and add it to your existing left strand.
- Cross the combined left strand under the new middle: Take this newly combined, thicker left strand and cross it under the middle strand.
Keep repeating steps 3-6, adding hair from the sides each time before you cross it under the middle. Try to keep the sections of added hair roughly the same size for a consistent braid. This consistency, you know, really makes the braid look polished.
Finishing Off Your Look
Once you've run out of loose hair to add from the sides, continue braiding the remaining three strands as a regular three-strand braid, still crossing them under each other. Braid down to the end of your hair and secure it with a hair elastic. For a fuller, softer look, you can gently pull on the loops of the braid (this is called "pancaking" or "pulling apart") to make it appear wider and less tight. Be careful not to pull too hard, or you might unravel your hard work! A little hairspray can help keep flyaways in place and give your braid extra hold. It's a pretty satisfying feeling once you're done, honestly.
Popular Dutch Braid Hairstyles to Try
The beauty of dutch braids is how adaptable they are. Once you've got the basic technique down, you can create a whole range of lovely hairstyles. You know, there's a style for almost every mood or occasion.
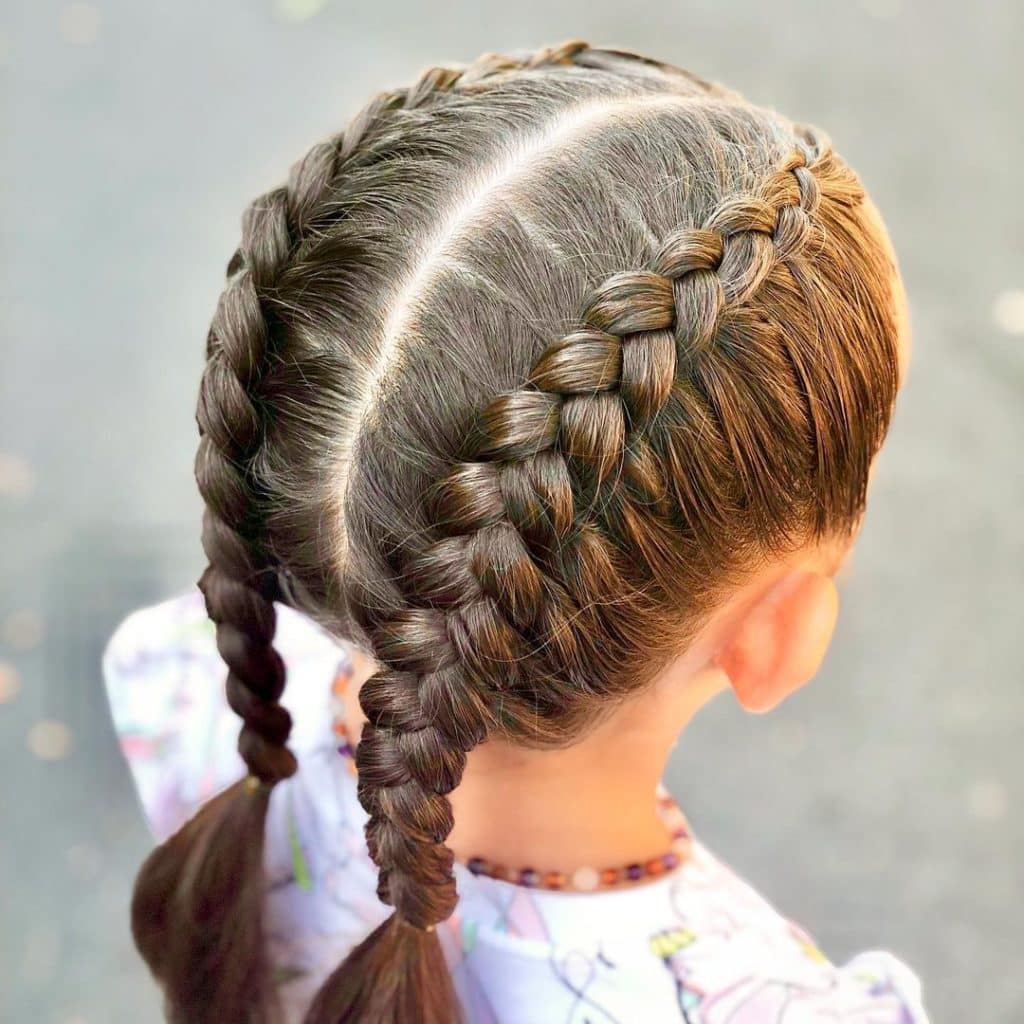
Classic Double Dutch Braids
This is probably the most common and recognizable dutch braid style. You create a neat center part and then braid two dutch braids, one on each side of your head, going all the way down. It's a fantastic look for casual days, workouts, or just when you want your hair neatly pulled back. They are, basically, a go-to for many people, offering both style and practicality.
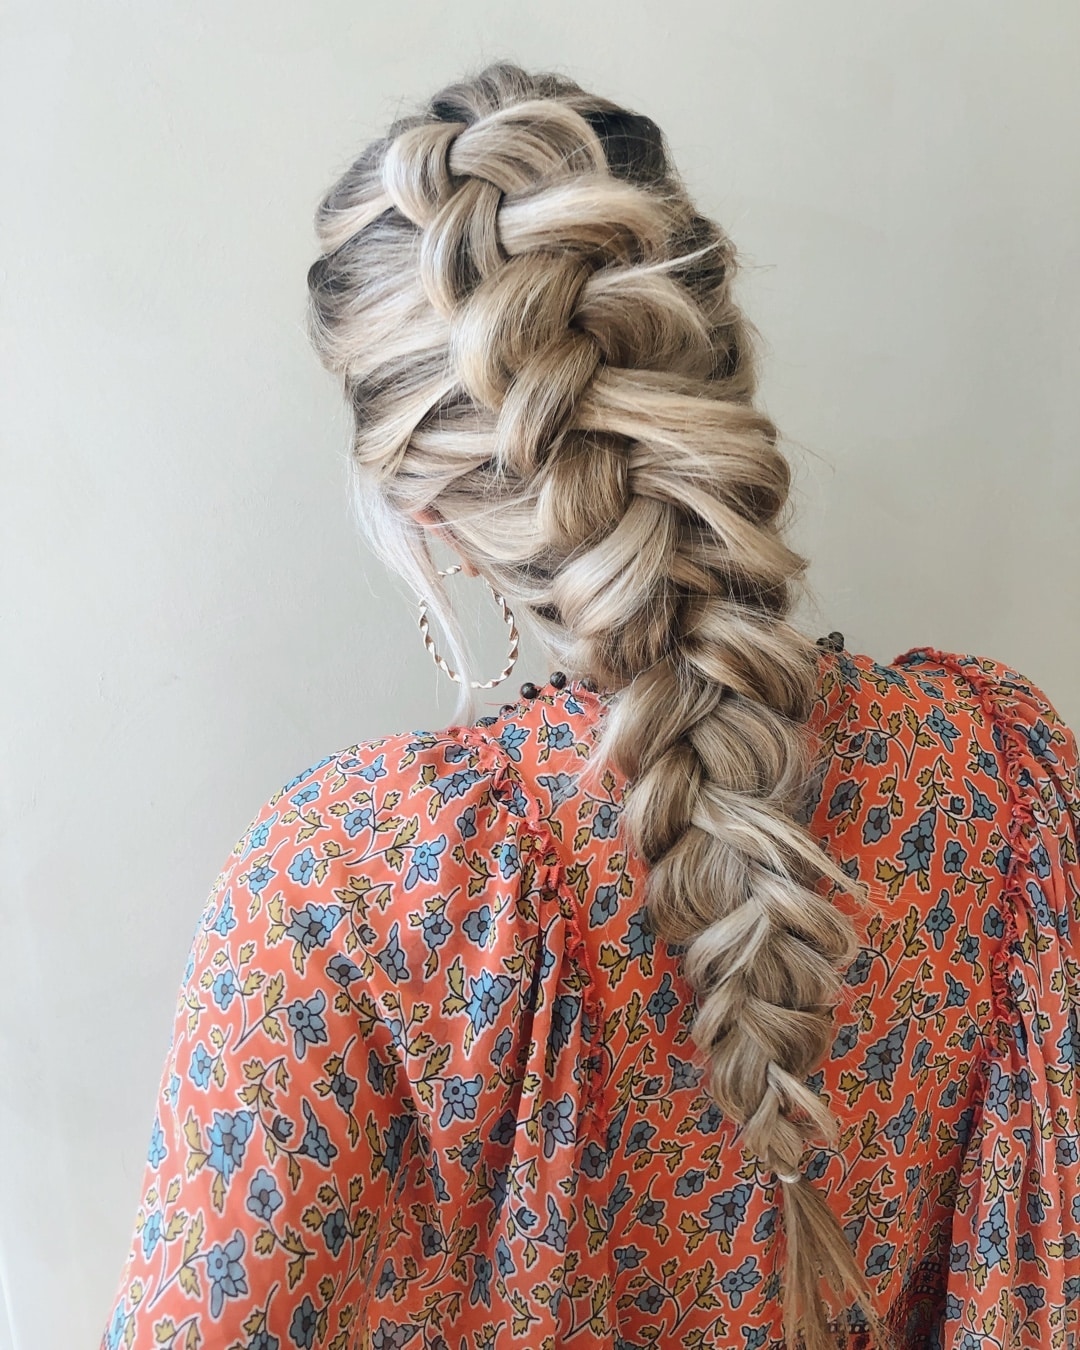
Single Side Dutch Braid
For a softer, more romantic feel, try a single dutch braid that starts from one side of your head and sweeps across, perhaps ending in a low ponytail or just secured behind your ear. This is a very charming style, great for adding a little something extra to your everyday look without being too formal. It’s a bit more subtle, which some people really like.
Dutch Braid Updos and Crowns
Dutch braids are excellent for creating elegant updos. You can braid two dutch braids, then cross them over the top of your head to form a "crown" or wrap them around the back of your head for a braided bun. These styles are perfect for special events like weddings or proms, offering a sophisticated and secure way to keep your hair up. They really do look quite regal, you know.
Half-Up, Half-Down Dutch Braids
If you want to show off your length while still having some hair pulled back, a half-up, half-down dutch braid is a great option. You can do a single dutch braid starting from the top and going back, or two smaller dutch braids on either side that meet in the middle. This style is very versatile, working for both casual outings and slightly dressier occasions. It's a pretty popular choice, you know, for a reason.
Tips for Keeping Your Dutch Braids Looking Great
Once you've spent the time creating your beautiful dutch braids, you'll want them to last! A few simple tips can help keep them looking neat and fresh for longer. It's all about a little bit of care, honestly.
Making Them Last Longer
- Sleep smart: To prevent your braids from getting messy overnight, try sleeping on a silk or satin pillowcase. This reduces friction, which can cause frizz and looseness. You can also loosely tie a silk scarf around your head.
- Use hairspray: A light mist of hairspray after braiding can help tame flyaways and add a bit of hold, making your style last longer.
- Avoid getting them wet: Water can cause braids to frizz and lose their shape. If you need to shower, consider wearing a shower cap.
- Refresh with dry shampoo: If your scalp starts to feel a bit oily, a quick spray of dry shampoo at the roots can help extend the life of your braids.
These little tricks, you know, really make a difference in how long your beautiful braids stay looking good.
Troubleshooting Common Braid Problems
- Frizz and flyaways: If you're dealing with stray hairs, a tiny bit of hair gel or styling cream smoothed over the braid can help. A toothbrush sprayed with hairspray can also be used to gently smooth down stubborn flyaways.
- Braids coming loose: Make sure you're pulling your sections taut as you braid. Not painfully tight, but firm enough to keep the braid secure. If your hair is too clean and slippery, add some dry shampoo or texturizing spray before you start.
- Uneven sections: This is a common one! Practice makes perfect. Try to keep your added sections of hair consistent in size. Using a mirror can help you see what you're doing better, especially when you're starting out.
Don't get discouraged if your first few attempts aren't perfect; it's a bit like learning any new skill, honestly. You'll improve with each try.
Caring for Your Hair with Braids
Even though your hair is braided, it still needs some care. If you plan to wear your braids for more than a day, consider applying a light leave-in conditioner or hair oil to your scalp and strands. This helps keep your hair hydrated and prevents dryness. When it's time to take them out, be gentle! Start from the bottom and slowly unbraid, using your fingers to loosen any tangles. A wide-tooth comb can help after the braid is fully undone. This gentle approach, you know, helps prevent damage.
Beyond the Basics: Advanced Dutch Braid Ideas
Once you're comfortable with the basic dutch braid, you can start experimenting with more creative and intricate styles. There are, you know, so many ways to make them your own.
Adding Accessories
Hair accessories can really elevate your dutch braids. Think about weaving in thin ribbons or scarves as one of your three strands for a pop of color. Small decorative clips, beads, or even fresh flowers can be tucked into the braid for a whimsical or elegant touch, depending on the occasion. This is a pretty simple way to customize your look.
Combining Braids
You can combine dutch braids with other braiding techniques or even different types of braids. For instance, you could start with a dutch braid at the top of your head and then transition into a fishtail braid or a regular three-strand braid at the ends. Or, try creating several small dutch braids and then gathering them into a larger ponytail or bun. The possibilities are, honestly, quite endless once you start playing around with it.
Frequently Asked Questions About Dutch Braids
Are dutch braids hard to do?
For many people, learning to do dutch braids takes a little practice. It’s not necessarily hard, but it does require getting used to the "under" motion, which is the opposite of a French braid. Once you understand the technique and practice a few times, it tends to become much easier. Patience and a good mirror can really help, you know.
How long do dutch braids last?
The lifespan of dutch braids can vary a lot, depending on your hair type, how active you are, and how well you care for them. Typically, a well-done dutch braid can last anywhere from one to three days. Some people manage to keep them looking good for even longer, especially if they use a silk pillowcase or a hair wrap while sleeping. It’s pretty variable, honestly.
What's the best hair type for dutch braids?
Dutch braids can work on most hair types, but they tend to look especially good on hair that has some natural texture or is a day or two old, as this provides better grip. Very fine or very silky hair might need a bit of dry shampoo or texturizing spray to help the braid hold its shape. Medium to thick hair usually shows off the braid's volume really well. So, basically, it’s quite adaptable!
- Drew Pritchard Ex Wife
- Who Is The Husband Of Stephanie Ruhle
- Mark Ruffalo Anne Hathaway Dupont
- Is Bjergsen Still Playing
- Father In Korean
21 Dutch Braids Hairstyles - Braid Hairstyles
21 Dutch Braids Hairstyles - Braid Hairstyles

How To Do A Dutch Braid | Super Easy Dutch Braid Tutorial
