Getting That Perfect Winged Eyeliner Look Today
Are you looking to make your eyes truly stand out? Perhaps you want to add a touch of classic charm to your everyday appearance. Winged eyeliner, you know, it's almost a timeless beauty technique that has captivated people for generations. It offers a subtle lift, adding a touch of drama and elegance to anyone's gaze. Many folks, you see, find themselves a bit puzzled by how to get this look just right.
It can feel like a big challenge, especially if you are new to makeup application. The idea of drawing a straight line, then adding a precise flick, might seem a little intimidating. You might wonder about the best products to use or how to make both eyes look the same. These are common thoughts, and it's perfectly fine to feel that way. We all start somewhere, and getting good at anything takes some trying.
This article is here to help you get a handle on winged eyeliner. We will go over the basic steps, share some useful advice, and talk about the tools that can make a difference. Whether you are just starting out or have tried before and want to get better, this guide is for you. You will find out how to create that striking winged look with more confidence, you know, today.
Table of Contents
- Understanding Winged Eyeliner
- Step-by-Step Guide to Winged Eyeliner
- Tips and Tricks for a Clean Wing
- Frequently Asked Questions About Winged Eyeliner
- Conclusion: Mastering Your Winged Look
Understanding Winged Eyeliner
Winged eyeliner is a style where eyeliner extends past the outer corner of the eye, creating a "wing" shape. This look can be very subtle or quite dramatic, depending on what you like. It has been a favorite for many years, you know, because of its ability to make eyes appear wider and more open. It can also give the impression of longer lashes, which is pretty neat.
Why Winged Eyeliner Is Popular
The popularity of winged eyeliner, you see, stems from its versatility. It can be worn for a casual daytime outing or dressed up for a special evening event. It has a classic appeal that never seems to go out of style. Many people, quite honestly, feel more put together and confident when they have a nice wing. It's a simple addition that can make a big impact on your overall appearance, that.
Moreover, it is a look that has been embraced by many famous people and makeup artists alike. This makes it a recognizable and sought-after style. Its enduring appeal, you know, suggests it will remain a staple in beauty routines for a long time to come. It truly is a go-to for so many, in a way.
- How Many Kids Does Khloé Kardashian Have
- Iris Lyrics
- Somali Link Telegram
- Lake Murray Baseball Academy
- What Season Does Debbie Get Pregnant On Shameless
Choosing Your Eyeliner Tool
The type of eyeliner you pick can make a real difference in how easy or hard it is to get your wing right. There are a few main kinds, you know, each with its own good points. Knowing about them helps you choose what is best for you. This is very, very important for a good start.
Liquid Eyeliner: This type often comes in a pot with a brush or as a pen. It gives a very sharp, clear line. Liquid eyeliner is great for a dramatic look. It can be a little tricky for beginners because it dries fast, but it offers a lot of control once you get used to it. Many pros like this for its intense color, you see.
Gel Eyeliner: Gel eyeliner usually comes in a small pot and you use it with a separate brush. It has a smooth texture, making it easy to glide on. It offers a good balance between the sharpness of liquid and the blendability of pencil. Gel is often a favorite for its ease of use and its rich color. It's a very forgiving option, sometimes.
Pencil Eyeliner: Pencil eyeliners are probably the easiest to start with. They are less intense than liquid or gel and allow for more room to correct mistakes. While they might not give the sharpest wing on their own, you can use them as a base. Some people, too it's almost, prefer a softer wing, and pencil is great for that. You can even use eyeshadow with a damp brush to create a softer wing, which is a neat trick.
Finding out more about the liquid, gel, and pencil eyeliners to use for a flawless wing is a good step. Each one has its own feel, so trying a few can help you discover what feels most comfortable and effective for you. It's pretty much a personal choice, you know.
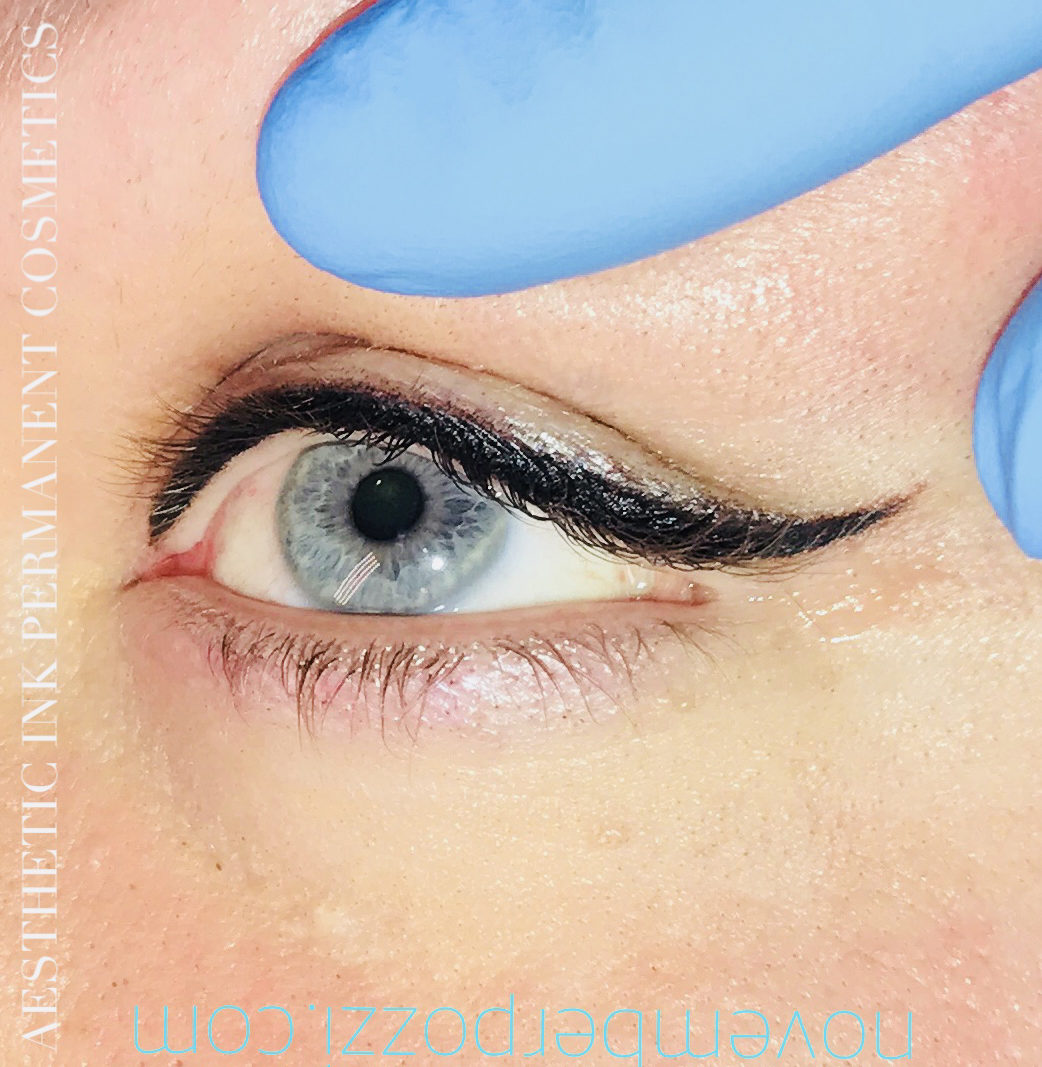
Step-by-Step Guide to Winged Eyeliner
Learning how to do winged eyeliner by following these easy and quick steps can really help. Practice makes perfect, and we’re showing you exactly how to apply winged eyeliner. Struggling to perfect how to do winged eyeliner is common, but these steps break it down. We will outline the essential steps to achieving flawless winged eyeliner that will elevate your makeup look to the next level.
Preparing Your Eye Area
Before you even pick up your eyeliner, you want to make sure your eyelid is ready. A clean, dry surface helps the eyeliner stick better and last longer. You might want to put a little bit of eye primer on your lid. This helps create a smooth base and can stop your eyeliner from smudging later in the day. It's a small step, but it makes a big difference, honestly.
The Initial Lash Line
To do winged eyeliner, start by applying eyeliner to your upper lash line. You want to work from the inner corner of your eye outward. Keep the line as close to your lashes as you can. This creates a base for your wing and helps your lashes look fuller. A thin line here is usually best to start, you know, especially if you are aiming for a delicate wing. This line should be pretty much even.
You can make this line thicker later if you want a more dramatic effect. For now, just focus on getting a steady, continuous line right along the base of your upper lashes. This first step is, in a way, the foundation of your whole winged look. Take your time with it, you know, it's not a race.
Creating the Wing Shape
Next, draw a thin diagonal line coming off of the outer corner of your eye. Think of it as an extension of your lower lash line, pointing upwards towards the tail of your eyebrow. The length and angle of this line will determine the look of your wing. A shorter, less angled line gives a subtle look. A longer, more angled line creates more drama. You know, you can use a small piece of tape as a guide for a very sharp line, which is a pretty common trick.
Many people find it helpful to look straight into a mirror when drawing this first wing line. This helps ensure both sides look symmetrical. You want to aim for a line that feels natural for your eye shape. This part, you know, is where the "wing" really starts to take shape. It's arguably the most defining part of the look.
Connecting the Lines
Once you have that first diagonal line, you need to connect it back to the line on your upper lash. From the tip of your diagonal line, draw a second line that sweeps down and connects to the middle or outer part of your upper lash line. This creates the top edge of your wing. It should form a triangle shape with the first diagonal line and your lash line. This step helps define the overall shape of your wing, you see.
The goal here is to create a smooth, continuous outline for your wing. If you are using a liquid or gel, you might find it easier to make small, short strokes rather than one long one. This helps with control and precision. You know, practice really does help you get this part down pat. It tends to be the trickiest bit for many.
Filling and Refining
Now that you have the outline of your wing, fill in the empty space within the triangle you just made. Make sure the color is solid and even. After filling, take a moment to look at your wing. Are the lines clear? Is the color consistent? You might need to go over it again to make it darker or to smooth out any wobbly bits. This is where you can perfect how to do winged eyeliner.
For a super sharp edge, some people use a small, flat brush with a little bit of concealer. You just clean up around the edges of your wing, which really makes it pop. This step is about making your winged look appear as clean and polished as possible. It's nearly the final touch, really.
Tips and Tricks for a Clean Wing
While a winged look may seem intimidating, there are tips, tricks, and methods you can use to get the look down pat. From makeup artists' reviews of the best products for winged eyeliner to pros' tips for how to do winged eyeliner, consider this your guide. Learn how to create flawless winged eyeliner with these tips and tricks on how to get effortless sharp lines with pencil and liquid eyeliner and eyeshadow!
For Different Eye Shapes
How to do winged liner on every eye shape is a common question. The perfect wing isn't one-size-fits-all. What looks great on one person might need a little adjustment for another. Knowing your eye shape can help you figure out the best angle and length for your wing. This makes a big difference in the final look, you know.
Almond Eyes: If you have almond-shaped eyes, you are in luck! Most wing styles work well. You can try a classic wing that extends slightly past your outer corner. It's pretty much a versatile shape for winged liner.
Round Eyes: For round eyes, extending the wing a bit further outwards can help lengthen the eye shape. This creates a more elongated appearance. A longer, more horizontal wing tends to look very good.
Hooded Eyes: Hooded eyes have a fold of skin that can hide the wing when your eyes are open. For this shape, try drawing your wing upwards from the outer corner, almost straight out, and then connecting it back. This is often called the "bat wing" method. It helps the wing stay visible, you know, even when your eyes are open.
Monolid Eyes: With monolid eyes, you might want to create a thicker line along the lash line to make the wing stand out. The wing itself can be quite bold. Some people, actually, draw the wing first and then connect it back to the lash line. It's a slightly different approach.
Downturned Eyes: For downturned eyes, focus on lifting the outer corner. Draw your wing with a clear upward angle, aiming to create a lifted effect. This helps counteract the natural downward slope. It's all about creating an upward visual, basically.
Understanding these small adjustments can really help you achieve a wing that flatters your unique features. It’s about adapting the technique to suit you, you know, rather than forcing one style. This is a very important point.
Common Struggles and Solutions
Struggling to perfect how to do winged eyeliner is a common thing. Many people face similar challenges. Knowing some quick fixes can save you a lot of frustration. It’s about having a few tricks up your sleeve, you know, for those moments when things don't go exactly as planned.
Uneven Wings: This is perhaps the most common problem. The trick is to work on both eyes at the same time, building up the wing gradually. Do a little on one eye, then a little on the other. This helps you keep them symmetrical. Stepping back from the mirror often helps you see if they match. It's a rather simple yet effective method.
Wobbly Lines: A shaky hand can lead to wobbly lines. Try resting your elbow on a table or flat surface for more stability. You can also anchor your pinky finger on your cheek. Small, short strokes are also better than one long, continuous line. This gives you more control, you know.
Smudging: Eyeliner smudging can be annoying. Make sure your eyelid is dry before applying. You can also set your liquid or gel liner with a matching eyeshadow. Just lightly tap a little powder eyeshadow over your finished wing. This helps it stay put, basically, all day long.
Getting the Angle Right: If you are unsure about the angle, use a small piece of tape or a business card as a guide. Place it at the outer corner of your eye, angled towards your eyebrow. Draw along the edge of the tape. This gives you a very sharp, precise line. It's a helpful little trick, you know.
These simple solutions can turn a challenging task into something much more manageable. Practice, you know, really does make perfect here. The more you try, the better you will get, naturally.
Products That Help
Beyond the type of eyeliner, some other products can help you achieve that perfect wing. From makeup artists' reviews of the best products for winged eyeliner to pros' tips, these items are often mentioned. They can make the process smoother and the result cleaner.
Eyeliner Brushes: If you are using pot gel eyeliner or even eyeshadow for your wing, a good brush is key. Look for a very fine, angled brush or a super thin pointed brush. These give you the precision you need for sharp lines. A clean brush makes a big difference, honestly.
Makeup Remover Pen/Swabs: Mistakes happen, and that is okay. A fine-tipped makeup remover pen or a cotton swab dipped in micellar water can help you clean up any errors. This allows you to refine your wing without starting all over again. It's like an eraser for your eyeliner, you know, very handy.
Eye Primer: As mentioned before, an eye primer creates a smooth base. It also helps your eyeliner last longer and prevents smudging. It’s a pretty good investment if you want your wing to stay put all day. It really does help with wear time, you see.
Setting Spray: After you finish your entire makeup look, a setting spray can help everything, including your winged eyeliner, stay in place. A light mist over your face can lock in your look. This is a final step that can make a big impact on how long your makeup lasts. It's a good way to secure everything, basically.
These tools, you know, are designed to make your winged eyeliner journey a little easier. They provide support and help you get a cleaner, more lasting result. It's about having the right gear for the job, in a way.
Frequently Asked Questions About Winged Eyeliner
People often have questions about winged eyeliner. Here are some common ones that come up, you know, when trying to get this look just right.
How do I make my winged eyeliner last all day?
To make your winged eyeliner last, start with a clean, dry eyelid. Apply an eye primer before your liner. After applying the liner, you can gently tap a little matching eyeshadow over it to set it. A setting spray at the end of your makeup routine also helps. These steps help prevent smudging and fading, you know, throughout the day.
What is the best type of eyeliner for beginners?
For beginners, pencil eyeliner is often the easiest to start with because it's more forgiving. It allows for mistakes and is simple to correct. Gel eyeliner in a pot with a fine brush is also a good option, as it glides smoothly and offers good control. Liquid pen eyeliners can be good too, but they dry faster, which can be a bit more challenging, you know, at first.
How do I make sure both wings are symmetrical?
Achieving symmetrical wings takes practice. The best approach is to work on both eyes little by little, rather than finishing one wing completely before starting the other. Draw a small bit on one eye, then match it on the other. Step back from the mirror often to check your progress. You can also use a small piece of tape or a stencil as a guide to help with the angle and length, which is a pretty common strategy.
Conclusion: Mastering Your Winged Look
You know, getting good at winged eyeliner is a skill that takes some trying. It might seem tricky at first, but with the right tools and a bit of patience, you can definitely get the hang of it. Remember, practice makes perfect and we’re showing you exactly how to apply winged eyeliner. From makeup artists' reviews of the best products for winged eyeliner to pros' tips for how to do winged eyeliner, consider this your guide. Whether you are a beginner or a more experienced person, these steps and tips are here to help you create a look you love.
The journey to a flawless wing is a personal one, and it's okay to make mistakes along the way. Each attempt helps you learn more about your eye shape and what works best for you. Keep trying different methods, and don't be afraid to experiment with different eyeliner types. You will find out more about the liquid, gel, and pencil eyeliners to use for a flawless wing. Learn how to create flawless winged eyeliner with these tips and tricks on how to get effortless sharp lines with pencil and liquid eyeliner and eyeshadow!
So, go ahead and give it a try. Find out how to do winged liner on every eye shape. With these steps and some regular practice, you will be creating stunning winged looks that make your eyes pop in no time. For more beauty tips, learn more about makeup techniques on our site, and link to this page our latest beauty trends. You can also find additional advice on reputable beauty sites, like this one, for more ideas. You know, it's pretty much all about enjoying the process.
- Michael Evans Behling
- Pippa Middleton Divorce
- Journeys Return Policy Worn Shoes
- How Much Is Parker Schnabel Worth
- Amrou Fudl

Winged Eyeliner How to Videos | StyleCaster
Winged Eyeliner - Upper - Aesthetic Ink Permanent Cosmetics

Winged Eyeliner Tips For Every Eye Shape
